5 Quick and Easy Halloween Costumes
Just because you didn’t take home a quilting prize at the county fair or volunteer to construct costumes for the school play doesn’t mean your child can’t have a homemade Halloween costume that will serve up smiles, giggles and maybe some envious stares.
Store-bought costumes can feel like manna from heaven in the midst of carpools, homework and little league schedules, but there’s something both magical and satisfying about creating the perfect costume by hand. With many families cutting back their spending lately, making your own simple creations can be easier on the pocketbook as well.
“It’s amazing how many different costumes I see sprout from a pair of sweats and all-purpose fabric glue,” says Jeannie Guffey, floor manager for Mary Jo’s in Gastonia, a magnet for craft and sewing enthusiasts from near and far.
People who don’t consider themselves Martha Stewart but want to go the homemade route needn’t fear, thanks to the magic of fabric glue and a little imagination. Affixing anything from feathers and balloons to fur or artificial leaves can be a cinch — and create a show-stopping masterpiece. “I’ve seen many parents glue sequin fabric and drape chiffon right over the top of an old skirt or dress to make a princess costume,” Guffey says. A large box suspended off a child’s shoulders also offers a blank slate, as you’ll see below.
Here are a few ideas from local moms to help jumpstart you and your child’s imaginations.
Baby Chicken
(submitted by Annie Hackett and her son, Ian)
Materials needed:
• Rubber gloves in yellow or orange
• White pajamas, sweats or long-sleeve onesie and tights (in yellow or white)
• Fabric glue
• 2 white feather boas
• White hat
• 1 square of red felt
• Batting
• Gummy worms (to eat)
Directions:
1. Glue feather boas to onesie, sweats or pajamas.
2. Cut red felt into a rooster’s crest; sew or glue onto hat.
3. Stuff rubber gloves with batting and tuck into pants or use ribbon to tie around ankles.
4. Let your child indulge in gummy worms as part of the act!
Birthday Cake
(submitted by Paula Willey and her son, Milo)
Materials needed:
• Large box
• Serrated knife (or electric knife)
• Red duct tape
• Semi gloss spray paint (brown, pink or color of your choice)
• Caulk
• Self-adhesive weather-stripping (measure to fit around the exterior of the box)
Directions:
1. Cut bottom of box with serrated knife using a sawing motion. Cut hole in top for child to fit through. Spray-paint box with whatever color you choose and let dry.
2. To create “suspenders,” measure and cut four lengths of duct tape, placing adhesive sides against each other but leaving a few inches of adhesive on each side to attach to inside of the box. Have child stand and hold the box up for a perfect fit, crossing strips in the back to create true suspenders. Secure inside with more duct tape.
3. Use white caulk to double as “decorator’s icing” and weather-stripping to simulate icing oozing out from between the layers.
Baby Spider
(submitted by Teri Ross and her son, Aaron)
Materials Needed:
• Long sleeve black onesie or leotard and black tights OR black sweatshirt and sweatpants
• two pairs of black socks (four socks in all — your child’s arms and legs will be four of the spider legs)
• cotton stuffing or batting
• black beanie (secure knit hat)
• Styrofoam ball cut in half
• bag of wiggly eyes
• hot glue gun
• white glue
Directions:
1. Spider head: Cut Styrofoam ball in half with a serrated knife or electric knife. Glue the wiggly eyes (spiders have lots!) to the Styrofoam halves. After glue dries, hot glue the Styrofoam to the beanie.
2. Spider body: Stuff the four socks with cotton stuffing. Sew four socks, two on each side down the back of the onesie.
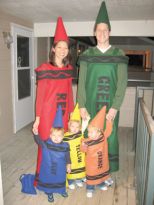
Crayon
(submitted by Jill and Steven Tew and their triplets, Zach, Jane and Kate)
Materials Needed:
• 2 yards felt of the same color
• 1/2 yard black felt for the color labels and details
• Poster board for cone hats
• Fabric glue
• Elastic
• Stapler
• Shirts to match the crayons
Directions:
1. Each crayon is made up of six rectangles: one large body piece, two shoulder straps, one around-the-shoulders strip and two black rectangle strips cut down the center in a wavy line (to make four wavy pieces) to be glued on with a slight gap in between.
2. Pin the body piece around the body and lift over child’s head to make sure you have enough room to get it on and off, then sew one simple seam down the back.
3. Sew shoulder straps on.
4. Pin the around-the-shoulder detail piece and adjust the placement, making sure child can move his arms and get the costume on and off. Then glue that piece onto the body piece.
5. Cut your letters out of black felt and glue them on the front, along with the remaining wavy line pieces.
6. Cut a cone out of poster board and staple in place. Then cover with felt and glue the edges down on the inside of the cone. Staple an elastic strip on opposite sides of the cone to hold the cone in place on the head.
7. Find matching colored long sleeve shirts to match the crayons and you’re set!
Zombie
(submitted by Deanna Lundy and her son, Connor)
Materials Needed:
• 1 large box
• 1 can matte brown spray paint
• 1 can metallic silver or gray spray paint (if making headstone instead of buying)
• Hot glue gun
• Fake grass (at most craft stores)
• 1 large piece of foam (at most craft stores) or pre-made foam headstone from store
• 1 small bottle black glossy craft paint
• 1 large rubber spider and/or rat
• 1 bag spider webs (at most craft stores or use a gauze-like substitute)
• 2 wooden cooking skewers (longest you can find)
• 1 Halloween make-up kit or individual face paints in black, gray, purple and white
Directions:
Cut hole in top of box for child’s head (all holes should be a little more toward one end of the box, so that your child will end up with a longer area in front of his face). While child is wearing the box, mark arm holes.
1. Have child remove box and cut arm holes.
2. Spray paint the box solid brown.
3. Working in about 6-inch sections, apply hot glue to top and spilling down onto sides of box. Gently press bunches of artificial grass into the hot glue.
4. If making your own headstone, cut foam to headstone shape (raw edges look more authentic) and spray paint with gray or silver paint. Let dry, then paint wording of your choice (“R.I.P” is a popular choice).
5. Take wooden skewers and push them, pointed side up, through box behind head hole.
6. Push headstone down onto skewers to hold it in place. When you get the headstone almost down to the box level on the skewers, stop and put a little hot glue on the skewers, then continue pushing headstone down. The glue will help make sure the headstone remains in place.
7. Hot-glue rubber spider and/or rat in the grass, then spread out soe cobwebs.
8. With face paint, use your imagination to create a pale, hollow-eyed zombie!
Heather Hayes is a freelance writer and mother in Charlotte.